I am in a moment that I want to change my health. I know that by simply changing my health, a lot of my life that I want will come naturally. It's not weight loss that I want, but it's the life I've lost because of my weight. I need to move forward and walk the walk. I have a ton of knowledge about health, yet I have bad follow through. This blog will make a difference because hopefully I can make a difference in your life. .

Friday, April 30, 2010

cabbage and lime salad with roasted peanuts

peanut lime slaw
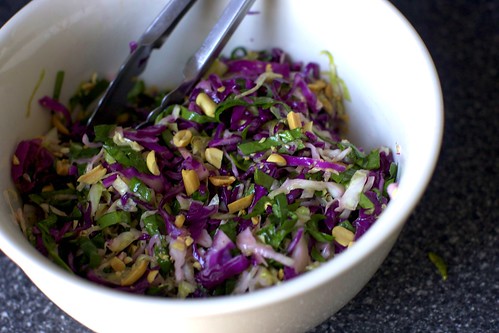
I know that on the surface, peering in from your side of the computer screen, this looks like a pile of shredded cabbage, a poorly lit one (look, it was late, okay?). But from my site, from my seat right here, this is pretty much the best thing ever, a yearly event I like to call First Slaw of the Season. red and green cabbage
salting the cabbage
Yes, friends, rooftop grilling season is back (or it was, er, briefly last Saturday afternoon but not really by Saturday evening, when we shivered around the actual grill; details) and I could not possibly be more excited. That means summer is coming. That means Jacob and I get to go to barbecues as separate human beings this summer (aw). That means that this one, the adult one, gets to have a beer (yay).
limes

And I know this is old news to some of you, but still, I must underscore again: We are slaw people. We really, really love our summer slaws. Not Your Mama’s Cole Slaw, Dead Simple Slaws, Green Onion Slaw, Tartar Sauce Slaw, slaw on tacos, Broccoli Slaw and Salads That Are Distinctly Slaw-Like. I even wrote an article about my slaw devotion. And then had a baby that looks like a cabbage (patch kid). I need help, I know.
shredded spinach
I also have a serious thing for the Lee Bros., those Charleston guys that got stranded for a few years on the lonely island of Manhattan and were forced to sell boiled peanuts and other wonders to their fellow displaced Southerners to stay warm. Okay, perhaps that’s a wee bit of a dramatic retelling but I do get carried away when I see their approach to cooking. And that they have a new cookbook out. I flipped it open in Barnes and Noble a few weeks ago and it landed on this page, exactly, with the prettiest peanut-ed slaw I’ve ever seen and literally, on the basis of that photo alone (see above: unhealthily obsessed with slaw), I bought the book. It was when I got home that I saw the pudding cakes and pudding parfaits and the, look, I just said pudding twice. How could you need to hear anything else before falling in love with this book?
ours
Cabbage and Lime Salad with Roasted Peanuts
Adapted from the Lee Bros. Simple Fresh Southern
Right, so, about the slaw: Lime. Peanuts. Red and green cabbage. Slivers of spinach. The lime is awesome, although I really have to advise against the whole lime segments they suggest in the original recipe (which I omit here) as we lovelovelove lime around here and it was still too much lime, by far. Peanuts are wonderful, even better if you can find some of those giant Virginia peanuts I sometimes see at stores (these, sadly, were not). The spinach is definitely a little odd in the slaw department; it is not the most stable lettuce thus not the kind of thing I’d want to eat hours after it had been tossed with dressing but in this, it works. And it makes the salad even prettier, which in my book counts too.
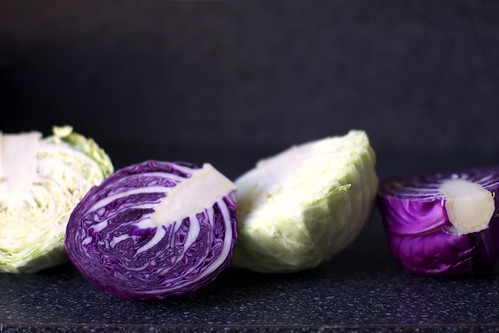
1/2 small red cabbage, trimmed, cored, and shredded (about 6 cups)
1/2 small green cabbage, trimmed, cored, and shredded (about 6 cups)
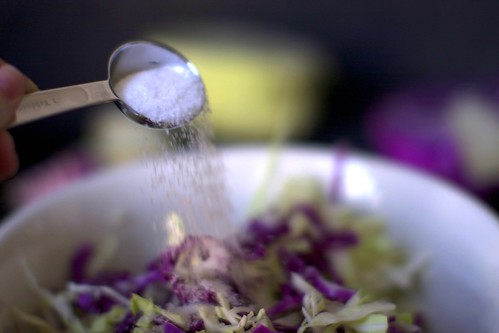
1 tablespoon kosher salt, plus more to taste
1 bunch fresh baby spinach, stemmed and cut into 1/2-inch wide ribbons (about 4 cups loosely packed)
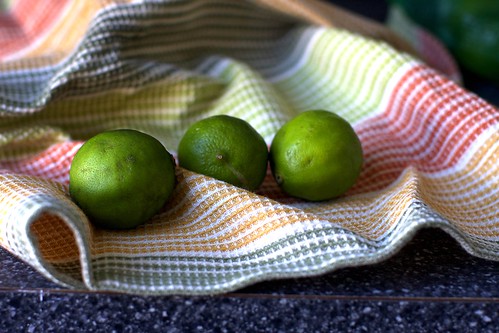
1/4 cup fresh lime juice (from about 2 small limes)
1 tablespoon Dijon or other salty prepared mustard
1/2 teaspoon ground cumin
1/4 cup peanut oil
1/2 cup roasted unsalted peanuts, coarsely chopped
Freshly ground black pepper
In a large bowl, toss the shredded red and green cabbage with the salt. Transfer the cabbage to a colander and let it drain for two hours. (I was in a rush and did this in one. It was still nicely wilted, but of course could have been even softer.)
If you’re worried about the cabbage being too salty when you’re done with the salting process, taste a piece of cabbage and if it concerns you, rinse and drain the cabbage well. This is not a suggestion in the original recipe, but something I suspect might bother some people.
Put the salted, drained cabbage back into your (rinsed and dried) large bowl and add the spinach. In a medium bowl, whisk the lime juice, mustard and cumin together. Add the peanut oil in a thin stream, whisking constantly until the ingredients are thoroughly emulsified. Toss the salad with the dressing and add the roasted peanuts. Season to taste with salt and pepper.
This salad is best served immediately, but it does keep surprisingly well in the fridge for a day or two.

Oatmeal Cottage Cheese Pancakes

These are wonderful and are almost too healthy to be true. Lots of calcium, protein, fiber, etc. I usually eat them without any topping and just keep popping them in my mouth! Yum. But a good jam will do them nicely as well.

SERVES 1

Ingredients

Directions

1. Blend all ingredients in blender.
2. Spray skillet with cooking spray and cook just like"silver dollar" pancakes, a few small ones at a time.
3. Top with your favorite pancake topping!

Real Recipes for Real People Homemade Instant Oatmeal Packets

by Kaylin Cherry
kaylin@
realfood4realpeople.com


I love the convenience of the instant oatmeal packets sold in grocery stores, but I do not like the cost. My children also love the instant oatmeal packets, and so I researched until I came up with this recipe for making them ourselves. Over time, we have added to the list of variations for this recipe, and have come up with some very fun packets, which are delicious as well as economical. We make these up as a family project, and the children help to choose which extra ingredients to add to the basic oatmeal packets. This is not only fun, but keeps them excited about eating them later, because they helped to make them. I hope you find them useful.
Instant Oatmeal ala-Home
  • 3 cups Quick-Cooking Oats
  • Salt
  • Small sized Zip Baggies
Put 1/2 cup oats in a blender and blend on high until powdery. Set aside in a small bowl, and repeat procedure with an additional 1/2 cup oats. If you're using a food processor, you can do the 1 cup of oats in one batch. Put the following ingredients into each zip baggie: 1/4 cup un-powdered oats, 2 Tbsp. powdered oats, and 1/8 tsp. salt. Store in an airtight container.
To serve: Empty packet into a bowl. Add 3/4 cup boiling water. Stir and let stand for 2 minutes. For thicker oatmeal, use less water - for thinner oatmeal, use more water.
Variations:
Apple-Cinnamon Oatmeal- To each packet add 1 Tbsp. sugar, 1/4 tsp. cinnamon, and 2 Tbsp. chopped dried apples.
Sweetened Oatmeal- To each packet add 1 Tbsp. sugar or 1 packet 'Equal' artificial sweetener.
Brown Sugar/Cinnamon Oatmeal - To each packet add 1 Tbsp. brown sugar & 1/4 tsp. cinnamon
Oatmeal w/Raisins & Brown Sugar - To each packet add 1 Tbsp. packed brown sugar and 1 Tbsp. raisins.
Health Nut Oatmeal - To each packet add 2 Tbsp. any kind of wheat germ
Fruit & Cream Oatmeal - To each packet add 1 Tbsp. non-dairy coffee creamer and 2 Tbsp. dried fruit
Fun Fruit Oatmeal - To each packet, add 6 or 7 pieces of 'fruit snack' type dehydrated fruit.
Confetti Oatmeal - To each packet, add 1 tsp. decorative cake/cookie sprinkles.
S'More Oatmeal - add 6 miniature marshmallows and 1 Tbsp. Milk Chocolate Chips to each packet.
Cookies n Cream Oatmeal - add 1 crushed Oreo cookie and 1 Tbsp. non-dairy coffee creamer to each packet.
Exploding Oatmeal - add 1 tsp. sugar, and 1/2 tsp. 'Pop Rocks' candy to each packet. This one is fun for celebration days, such as birthdays.
Bart-man Oatmeal - add 2 Tbsp. 'Butterfinger B.B's' candies to each packet.

How to Make Coconut Milk


If you….
  1. Love recipes that only take about 3 minutes of total prep time…
  2. Love all things coconut
  3. Don’t love all things coconut (like me…but I love this milk!)
  4. Love milk
  5. But maybe don’t like or can’t drink regular milk for various reasons
  6. Are a Vegan
  7. Don’t like paying for overpriced coconut milk in the stores
  8. Like being able to control the type/amount of sweetener in your coconut milk
  9. Have yet to ever experience the sweet, creamy, rich goodness of coconut milk…….
Then this recipe is for you!!!!!

Truly, it’s so fast, and so simple, so cheap, and so delicious that there’s no reason NOT to try it.  :)  It’s full of great nutrients, and can be used a zillion ways.  (I’ve included a short list below of some possible uses, both in and out of the kitchen.)  So grab a bag of coconut, and give it a try!  I really think you’ll love it!


How To: Make Coconut Milk
(Adapted from Elana’s Pantry)
Ingredients:
  • 2 cups unsweetened shredded coconut
  • 4 cups water
  • 1 Tbsp. honey or agave nectar (or 6 drops stevia)
  • 1 tsp. vanilla extract
Method:
Soak coconut in water for 1-2 hours (do not discard water).
In a blender (or you could do small batches in a food processor), combine coconut, water, vanilla and honey and process on highest speed.
Strain liquid through a fine mesh strainer (or a strainer bag, or cheesecloth would work), discarding solids.  Serve or refrigerate.
Possible Uses:
  • Baking: can be used as a substitute for milk in a variety of baking recipes
  • Beverages: coffee, tea, smoothies, milkshakes, eggnog, pina coladas, or a variety of alcoholic beverages
  • Cooking: used in noodle dishes, rice dishes, grain dishes, stir-frys, etc., and it is called for especially in many Thai, Indian, African and Hawaiian dishes
  • Skin Care: used as a moisturizing face wash, mixed into water for a bubble bath, or even used as a hair conditioner
Ali’s Tip:
This also works with sweetened coconut.  Just omit the extra natural sweetener (honey, agave, stevia, etc.).


April 19th, 2010

For the final recipe on Day 7 of “Hip Hip for Hummus Week”, we visit a classic cheesy dip translated into a healthier (and vegan) alternative — spinach and artichoke hummus!
I thought it would be a fun experiment, but was surprised by how much I loved this recipe!  The classic spin-artichoke combination, paired with the rich tahini and lemon juice proved to be even more flavorful (in my opinion!) than the classic dip I’ve made for years!  And…you get to trade in a bunch of extra fiber for all of that cheese.  :)
I’m sure I’ll still continue to make both, but this is a wonderful alternative for whenever you get the spinach artichoke craving!  And, with no baking required, it can be whipped up in less than 5 minutes.  Perfect!
As a recap, here were the 7 recipes in “Hip Hip for Hummus Week”.  Enjoy!!


Spinach Artichoke Hummus
(Original recipe)
Ingredients:
  • 1 (15 oz.) can chickpeas, drained (juice reserved)
  • 4 cups fresh spinach, loosely packed
  • 1/2 cup artichoke hearts
  • 2 Tbsp. tahini
  • 2 Tbsp. lemon juice
  • 2 Tbsp. olive oil
  • 2 cloves garlic, peeled and smashed
  • salt and pepper, to taste
Method:
Combine all ingredients in a food processor, and blend until smooth.  If you desire a thinner consistency, add in a few extra tablespoons of the reserved chickpea juice.
Ali’s Tip:
To give this an extra kick, I also tried adding in a seeded fresh jalapeno, and it was fantastic!  You could even add in half of a pepper if you’d like.
Also, to make this taste a little more like classic spinach-artichoke dip, just mix in 1/4 (or 1/2 cup) grated parmesan cheese.

Aren’t these just wonderful?
Let me introduce these delicious ingredients that have been captured bathing in the morning sun.
And they are ready and eager to turn into…


… the most yummilicious and soul-warming soup ever invented.


And here we have our ingredients introducing themselves to you in a written form.
So kind of them.
In case you’d also like to have the delightful experience of tasting this soup, just go on and follow these easy steps


1. Chop the onion finely.
Chop, chop, chop.


2. Cut the carrots into small even dices.


3. Remove the leaves from the cauliflower and cut it into halves.


4. Now break it into individual florets.
Rinse the florets under running water and then slice them into smaller pieces – you can slice one floret into 2 or 3 pieces (depending on what mood you are in).


5. In a large soup pot melt two tablespoons butter.


6. Add the chopped onions, stir and let them get a little color inside there.


7. Then, after about 3 minutes, add the carrots.
Stir around for about 2 more minutes.


8. Soon we are going to use the chicken broth/bouillon.
You can use the ready-made stuff from a store or you can prepare it at home – from bouillon cubes – like I do.
I used 3 bouillon cubes for 7 cups (1.75 l) hot water.
And, of course, you can also use your own, home-made bouillon.
You really have a wide range of possibilities here.


9. Throw the cauliflower into the pot and pour in the bouillon.


10. Add 2 teaspoons parsley, …


11. … 2 bay leaves, …


13.  … and 1/4 teaspoon black pepper.
Stir to combine.
14. Cover and bring to a boil over medium heat.
Then reduce the heat and let the soup simmer for about 25-30 minutes.


15. Meanwhile, we can prepare our white sauce that will make the soup nice and thick.
In a separate bowl, combine 3 cups milk with 4 tablespoon flour…


… and mix with a whisk.


16. In a medium saucepan, melt 1 tablespoon butter.


17. Pour in the ‘milk-flour’ mixture…


18. … and stir constantly over medium heat.
Bring to a boil and mix for about 2 more minutes.
Then remove from the heat.


19. Add the white sauce to the soup mixture and stir to combine.
Let simmer for about 5-10 more minutes.
Then remove from the heat.
Add 2 1/2 heaping tablespoons sour cream and stir again.
Taste the soup and add salt to taste (if needed).


This is D-E-L-I-C-I-O-U-S!
Just trust me.
The best soup ever.


This summer, take the time to get a little dirty and source your food outside the market. Get to know the people who make your food.  See where your food comes from. And eat it right from the ground, dirt and all.
Photo by Cheryl

Asparagus and Tomato Pizza

Use your favorite pizza dough (or my version) to create a summery pizza.  Vary the toppings according to what’s in season and what you find that day on your farm visit.
  • 1 clove garlic, finely chopped
  • 1-2 tablespoons olive oil
  • 1/2 bunch asparagus
  • 1/2 pint cherry tomatoes, halved
  • 1/2 cup crumbled feta cheese
  • 1 tsp dried oregano
  • Pizza Dough
1. Preheat your oven to 450 degrees F. Pull out your dough into rough 8-10 inch circles. Place onto a thick cookie sheet or pizza stone sprinkled with cornmeal.
2. Trim any rough bits from your asparagus (if it is farm fresh you shouldn’t have to do a thing). Cook in boiling water for 1 minute then immediately submerge in ice water to stop the cooking.
3. Drizzle your stretched pizza dough with the garlic and olive oil.  Arrange the asparagus and halved tomatoes over the pizza. Sprinkle the feta and oregano on top. Add an extra drizzle of olive oil on top.
4. Bake for 10-15 minutes until pizza is cooked all the way through and cheese is bubbling slightly.

Whole Wheat Spaghetti with Green Garlic and Fried Egg

Whole Wheat Pasta with Green Garlic and a Fried Egg

Another week, another whole wheat pasta recipe with a spring delicacy. I first fell in love with green garlic two years ago when I started food blogging. It has such a great flavor and cooking with it is easy and it doesn't burn as quickly as garlic cloves. I pretty much only use the white and light green parts, but in the LA Times version of this recipe, it looks like they use the whole thing. It's a great, quick cooking dish and the egg yolk helps create a lovely creamy sauce. It's been a little chilly here this week so this was a nice dish to curl up on the couch and watch some of my favorite trashy tv shows.


Whole Wheat Spaghetti with Green Garlic and Fried Egg
(Slightly Adapted from the Los Angeles Times)


Makes 2 servings

4 ounces whole wheat spaghetti
4-5 stalks green garlic, halved lengthwise, washed, dried and sliced thinly
3 tablespoons olive oil, divided
2 eggs, at room temperature
Coarsely grated black pepper
Sea salt

Bring a large pot of salted water to a boil and cook the spaghetti until just al dente, about 9-11 minutes, or according to the instructions on the package.

Meanwhile, heat 2 tablespoons of olive oil in a large skillet over medium-high heat. Add the garlic and cook until tender and beginning to caramelize, about 5 minutes, stirring frequently so as not to burn. Remove the garlic from the pan and put it into a large bowl. When the pasta is cooked, add it, with a bit of the pasta water, to the bowl with the garlic and toss to combine.

Add the remaining 1 tablespoons of olive oil to the pan and turn the heat to high. One at a time, break the eggs into a small bowl and gently pour into the hot skillet, trying to keep them from touching. Cook until the edges are crispy and golden brown, the whites are set and the yolks are still runny.

Divide the warm pasta among plates. Gently slide an egg onto the top of each. Grind plenty of black pepper over each plate and add a generous pinch of sea salt. Serve immediately.

Strawberry Jam - Granulated Sugar Free, Pectin Free & Dead Easy


Many summers ago I woke up with an almost overwhelming urge to connect with the brave frontier women who came before me by taking perfectly sun ripened fruit and turning it into jam thus preserving the bounty of the harvest for the long hard winter to come.


I set off early, purchasing enormous pots, sterilizing equipment, cute jars and flats of peaches. Happy with my haul (and poorer by about $250.00) I got to work. I blanched, peeled and pitted. I washed and sterilized. I boiled, simmered and stirred, all the while humming a wordless tune I was certain my fore-mothers had hummed many moons ago.

And then it happened! What can only be described as an apocalyptic catastrophe turned my peaceful afternoon into a scene so horrendous it would surely be rated NC-17 (for violence) if life were rated the way movies are. Jars started exploding, shooting out shards of glass covered with sticky, icky goo everywhere. The shards embedded themselves into the cabinets, walls and ceiling dropping fat splatters of peachy tar over every surface.

I plucked goopy glass from my hair, arms and feet. I washed and scrubbed and mopped. I cursed my fore-mothers so loudly and vehemently it would have brought a blush to Joe Pesci’s face.

At the end of a very long, arduous day I surveyed the fruits of my labor. I had one $250.00 jar of slightly brownish, uncongealed peach jam, a spotless kitchen and a body covered with Hello Kitty Band-Aids.

It was then that I realized that those brave frontier women who came before me didn’t have a choice. They had to preserve the fruits of the harvest lest they stave during the cold hard winters. I also realized I lived in California where the winters are anything but cold and hard, that I have a damn car and can go to the damn store and buy some damn jam.

That was the end of my jam making until recently. I got swept away by the gorgeous strawberries at the market selling for a pittance and brought home far more than I could consume before they went bad. What to do?


I decided I would make jam again. But this time on my terms. Forget those damn frontier women. So I came up with what is possibly the easiest jam known to man (and certainly to those fore-mothers of mine). It also happens to be granulated sugar and pectin free jam. And yes, of course, it is gluten free as well.

So if you like slaving like a dog for your jam, then skip this recipe. If on the other hand you want to revel in luscious jam that is ridiculously easy, then by all means read on.


Strawberry Agave Jam

(printable)

Ingredients:

1 pound fresh strawberries, hulled, rinsed and halved
½ cup agave nectar

Directions:

Combine strawberries and agave in a heavy saucepan over medium high heat and bring to a boil. Lower the heat so that the mixture continues to boil gently. Stir the mixture a few times while cooking to prevent sticking or scorching and mash the berries a few times, a potato masher works well for this or you can use the back of a spoon.

Continue cooking for 25 minutes or until the berries have broken down and the mixture is very thick. Cool to room temperature. Mixture will thicken and jell up as it cools.

Store in a clean jar for up to a week.

Makes about 1 cup of jam.

Potluck Pockets

Here is another recipe for you today that uses pitas.  I am hoping to try a homemade version of pitas soon.  When I do I will share.
This is a recipe I have been making for a while and is a family favorite.  I found it years ago in a Taste of Home magazine.  The pockets are filled with a savory beef filling.  Then you drizzle it with a sauce.  The recipe is quite salty so if you are not a fan of salty you may not like this one.  The salty flavor comes from soy sauce and worcestershire sauce.  This will be a great recipe for warm weather,  It’s all made on the stove top!  It also comes together in about 30 minutes.

Potluck Pockets
  • 1 pound ground beef
  • 1/2 cup chopped onion
  • 1/2 cup chopped green pepper
  • 2 tablespoons Worcestershire sauce
  • 2 tablespoons soy sauce
  • 2 teaspoons garlic powder
  • 1 teaspoon ground cumin
  • 1/2 teaspoon Italian seasoning
  • 6 pita breads, halvedon
  • 2 medium tomatoes, diced
  • 3 cups shredded lettuce
  • SAUCE:
  • 1/2 cup soy sauce
  • 1/4 cup white vinegar
  • 2 tablespoons Worcestershire sauce
  • 1/2 teaspoon onion powder
  • 1/2 teaspoon Italian seasoning
  • Dash pepper
  1. In a large skillet, cook the beef, onion and green pepper over medium heat until no longer pink; drain. Add the Worcestershire sauce, soy sauce, garlic powder, cumin and Italian seasoning; mix well. Bring to a boil. Reduce heat; simmer for 5-10 minutes.
  2. In a small saucepan, bring sauce ingredients to a boil. Reduce heat; simmer for 5-10 minutes. Spoon meat mixture into pita halves; top with sauce, tomatoes and lettuce. Yield: 6 servings

Fruited Tuna Salad Pitas

My last and final prize winner for the blue topaz is Valen who said, “Love that necklace and cake!”  Enjoy the necklace,  it is a simple yet beautiful design.
As the weather starts to warm up, it would be nice to have a few great meals that don’t require much effort or time in the kitchen.  This recipe for Fruited Tuna Salad Pitas came from my recent issue of Simple and Delicious.  It is perfect for those kind of days.  I have had a sweet tuna salad before with fruit in it and loved it, so I figured I would also enjoy this version.  It was tasty.
My family turned their nose up at it at first but loved it once they had their first bite.  My husband is not a fan of mandarin oranges and he didn’t mind them at all in this dish.  Light and refreshing, perfect for those I don’t want to cook nights!  The salad is intended to be put on a whole pita and eaten like a taco.  However, it would also work well inside a pita pocket if you’d prefer.  You could  place them on the flat bread recipe I have shared before.  You could even substitute chicken for the tuna too.

Fruited Tuna Salad Pitas
  • 1/2 cup mayonnaise
  • 1 Tbsp. honey
  • 1 can (12 oz) white albacore water packed tuna, drained (regular tuna would also work)
  • 1 can (11 oz.) mandarin Oranges, drained
  • 1 medium apple, chopped
  • 1/3 cup chopped pecans
  • 1 rib celery, thinly sliced
  • 1/4 cup dried cranberries
  • 1/8 tsp. salt
  • 4 (6 in.) pita breads
  • alfalfa sprouts (or you could use lettuce if you prefer)
  1. In a large bowl, combine the mayonnaise and honey.
  2. Stir in tuna, apple, pecans, celery, cranberries and salt.  Gently fold in the oranges.
  3. Top each pita with sprouts followed by the tuna salad.

Black Bean and Pepper Salad Recipe with Cilantro and Lime


Black Bean and Pepper Salad with Cilantro and Lime(Updated and added to Recipe Favorites, April 2010.) Black beans are such a great pantry ingredient, and this simple salad with black beans, red and yellow bell pepper, red onion, lime, and cilantro has all the flavors that make me happy. I love the colors in this salad too, so when I made it recently to take to my dad for lunch I decided it was time to take new photos and update the recipe. For best flavor, mix the dressing and let the beans marinate for a while (or at least while you chop the other ingredients) but even if you're in a rush like I was and forget to marinate the beans, it will still taste pretty great!

Drain the black beans into a colander placed in the sink, then rinse with cold water until no more foam appears and let beans drain.

If you have a fresh lime, some lime zest added to the dressing really brightens the flavor.

After you mix all the dressing ingredients, marinate the drained beans in part of the dressing mixture if you have time.

Chop peppers the same size as the beans, and mix the marinated beans and peppers together.

I used Rick Bayless' cilantro chopping method where you keep the bunch of cilantro together and thinly slice the leaves up to where the stems start.

Mix the red onion and chopped cilantro into the bean and pepper mixture, then add the rest of the dressing, season with salt and fresh ground black pepper and serve.

Black Bean and Pepper Salad with Cilantro and Lime
(4 servings, recipe created by Kalyn with inspiration from a blog that no longer exists)

1 can black beans, rinsed well and drained
1 red pepper, chopped
1 yellow pepper, chopped
(could use any combination of colors for the pepper, or use 2 red peppers)
1/2 red onion, chopped
1 bunch cilantro, chopped

Dressing:
2 T lime juice (fresh lime juice recommended)
2 T extra virgin olive oil
1/4 tsp. ground Chipotle pepper (I use Penzeys)
(you could use green Tabasco in place of the Chipotle pepper)
1/2 tsp. mild chile powder (New Mexico chile powder is best)
1/2 tsp. ground cumin
1/2 tsp. onion powder
zest of one lime (optional, but recommended)
Vege-sal or salt to taste
fresh ground pepper to taste

Put black beans in a colander placed in the sink and rinse with cold water until no more foam appears. Let beans drain, preferably 30 minutes or so, until beans are no longer wet. (If you're rushed for time, you could blot them dry with paper towels.)

Mix dressing ingredients. Put beans and dressing into a plastic bowl with a snap-on lid, put lid on, and turn bowl over a few times until the beans are well coated with the dressing. Let the beans marinate in the dressing for an hour or so if you have time, or at least while you chop the other ingredients.

Chop peppers and onion into pieces about 1/2 inch square. (I was aiming for the beans, peppers, and onions to be approximately the same size.) Wash cilantro and dry well (I used a salad spinner) then chop coarsely.

In large bowl, gently combine beans, peppers, and onion. (If mixture seems dry you can add a tiny bit more olive oil and lime juice at this point.) Season to taste with Vege-sal or salt and fresh ground pepper. Stir in cilantro and serve.

This will keep for a day or two in the refrigerator, although it's best when the cilantro is still crisp. However, I taste-tested it on my friend Robin when it had been in the refrigerator overnight and she gave it a very enthusiastic thumbs up.


South Beach Suggestions:
Everything in this salad is a perfect low-glycemic ingredient, making this a great recipe for any phase of the South Beach Diet. (Remember that dried beans are limited to 1/3 to 1/2 cup serving for phase one.)